
Overview
Using Packer to create a Ubunut 22.04 server image within Proxmox. This is designed with Proxmox Virtual Environment version 7.1 in mind.
Check out all of the configuration files on GitHub at the repository.
Prerequisites
- Must have Packer configured on your machine, DHCP running on the network, and a Proxmox server available (Preferrable to be version 7.1)
- Have a Proxmox user created with proper privledges for Terraform (See how to create the user here)
- Ubuntu Server 22.04 Iso uploaded to your Proxmox server
Getting proper files setup
There are two primary files that will need configured.
The first of the two is our credentials.pkr.hcl file. Update all variables within to your own. Any more in-depth configuration can be done within the ubuntu-server-focal.pkr.hcl file.
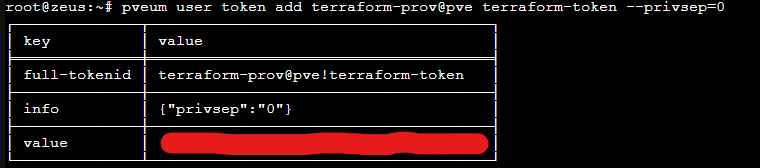
You can generate your token-id and token secret using the following command into your Proxmox Shell pveum user token add terraform-prov@pve terraform-token --privsep=0 Replace terraform-prov@pve with your created username Write this down because you won’t be able to find this access token again later
An Example credneitals/pkr.hcl file
| |
Second file to update to your preference is our user-data.example file. You only need to update the fields beneath user-data, users + passwd, and potentially your timezone.
The passwd fields in cloud-init files must be in a sha-512 hash. Generate a hash using echo passwd | mkpasswd -m sha-512 -s
An Example user-data file
| |
Finally, the Packer Process
First thing we should do prior to going further, is double check the valiation of our Packer files. Otherwise we could have some major headache.
cd into the project directory (./ubuntu-server-focal), and run
packer validate -var-file='..\credentials.pkr.hcl' .\ubuntu-server-focal.pkr.hcl- If any errors show up, you’ll have to fix them before moving on
Once we have confirmed everything appears correct, we can run the build, cross our fingers, and it should work.
- Build the image (Within the same project directory where you ran the validate),
packer build -var-file='..\credentials.pkr.hcl' .\ubuntu-server-focal.pkr.hcl