Crowdsec & Traefik: Automating Security in Your Homelab
Hello there! Today, I’m thrilled to introduce you to Crowdsec, an open-source Security threat intelligence project that’s perfect for boosting security in your homelab.
Prerequisites
Before we embark on our journey into a safer network, let’s check off these prerequisites:
- Prior experience with networking and a good understanding of network protocols.
- Some exposure to Docker as we’ll be using Docker-Compose for the setup.
- An external service in your homelab that you’re eager to fortify!
Ready? Let’s dive in!
Setting up Traefik
Setting up the Docker container for Traefik is a breeze, provided you have a couple of files handy.
Note: In this setup, we’ll be using Cloudflare as the certificate handler via Let’s Encrypt. Although I won’t go into details on this here, you’ll need a domain and API access to your DNS Zones.
First, let’s create a directory named traefik and within it, two more directories, logs/ and data/.
1
2
3
| mkdir traefik
cd traefik
mkdir logs/ data/
|
Now, in the traefik directory, create a new docker-compose.yml file.
1
| nano docker-comopse.yml
|
Input the following configuration:
 1
 2
 3
 4
 5
 6
 7
 8
 9
10
11
12
13
14
15
16
17
18
19
20
21
22
23
24
25
26
27
28
29
30
31
32
33
34
35
36
37
38
39
40
41
42
43
44
45
46
47
| version: '3'
services:
traefik:
image: traefik:latest
container_name: traefik
restart: unless-stopped
security_opt:
- no-new-privileges:true
networks:
- proxy
ports:
- "80:80"
- "443:443"
environment:
- CF_API_EMAIL=${CF_API_EMAIL}
- CF_API_KEY=${CF_API_KEY}
volumes:
- /etc/localtime:/etc/localtime:ro
- /var/run/docker.sock:/var/run/docker.sock:ro
- ./logs/traefik-access.log:/var/log/traefik
- ./data/traefik.yml:/traefik.yml:ro
- ./data/acme.json:/acme.json
- ./data/config.yml:/config.yml:ro
labels:
- "traefik.enable=true"
- "traefik.http.routers.traefik.entrypoints=http"
- "traefik.http.routers.traefik.rule=Host(`traefik.domain.com`)" #Domain-Here
- "traefik.http.middlewares.traefik-auth.basicauth.users=${BASICAUTHUSER}"
# Generate BASID_AUTH_PASS: echo $(htpasswd -nb "<USER>" "<PASSWORD>") | sed -e s/\\$/\\$\\$/g
- "traefik.http.middlewares.traefik-https-redirect.redirectscheme.scheme=https"
- "traefik.http.middlewares.sslheader.headers.customrequestheaders.X-Forwarded-Proto=https"
- "traefik.http.routers.traefik.middlewares=traefik-https-redirect"
- "traefik.http.routers.traefik-secure.entrypoints=https"
- "traefik.http.routers.traefik-secure.rule=Host(`traefik.domain.com`)" #Domain-Here
- "traefik.http.routers.traefik-secure.middlewares=traefik-auth"
- "traefik.http.routers.traefik-secure.tls=true"
- "traefik.http.routers.traefik-secure.tls.certresolver=cloudflare"
- "traefik.http.routers.traefik-secure.tls.domains[0].main=.domain.com" #Domain-Here
- "traefik.http.routers.traefik-secure.tls.domains[0].sans=*..domain.com" #Domain-Here
- "traefik.http.routers.traefik-secure.service=api@internal"
networks:
proxy:
external: true
#Ensure to setup docker netowork (`docker network create proxy`)
|
With that created, navigate into your data/ directory and create config.yml
1
2
| cd data/
nano config.yml
|
Fill it with the following: (This will be updated again later; I left a snippet in there about pi-hole, for refernence on how to setup a HTTP / HTTPS router service)
 1
 2
 3
 4
 5
 6
 7
 8
 9
10
11
12
13
14
15
16
17
18
19
20
21
22
23
24
25
26
27
28
29
30
31
32
33
34
35
36
37
38
39
40
41
42
43
44
45
46
47
48
49
50
51
52
53
54
55
56
57
58
59
60
61
62
63
64
65
66
67
68
69
70
71
72
73
74
75
76
77
78
79
80
81
82
83
| http:
#region routers
routers:
# Pihole http
pihole:
entryPoints:
- "http"
rule: "Host(`pihole.domain.com`)"
middlewares:
- https-redirectscheme
service: pihole
# Pihole https
pihole-secure:
entryPoints:
- "https"
rule: "Host(`pihole.domain.com`)"
middlewares:
- default-headers
- addprefix-admin
tls: {}
service: pihole
#region services
services:
passHostHeader: true
# Pihole Loadbalancer
pihole:
loadBalancer:
servers:
- url: "http://pihole-ip-here:80"
passHostHeader: true
#endregion
middlewares:
# Prefix all traffic to admin page
addprefix-admin:
addPrefix:
prefix: "/admin"
# Redirect all http traffic to https
https-redirectscheme:
redirectScheme:
scheme: https
permanent: true
# Add default headers for redirection
default-headers:
headers:
frameDeny: true
browserXssFilter: true
contentTypeNosniff: true
forceSTSHeader: true
stsIncludeSubdomains: true
stsPreload: true
stsSeconds: 15552000
customFrameOptionsValue: SAMEORIGIN
customRequestHeaders:
X-Forwarded-Proto: https
# Whitelist all private IP addresses
default-whitelist:
ipWhiteList:
sourceRange:
- "10.0.0.0/8"
- "192.168.0.0/16"
- "172.16.0.0/12"
# Used for headers
secured:
chain:
middlewares:
- default-whitelist
- default-headers
tcp:
routers:
# Whitelist all private IP addresses
middlewares:
default-whitelist:
ipWhiteList:
sourceRange:
- "10.0.0.0/8"
- "192.168.0.0/16"
- "172.16.0.0/12"
|
While still in the same directory, create traefik.yml
and fill it with:
 1
 2
 3
 4
 5
 6
 7
 8
 9
10
11
12
13
14
15
16
17
18
19
20
21
22
23
24
25
26
27
28
29
30
31
32
33
34
35
36
37
38
| api:
dashboard: true
debug: true
entryPoints:
http:
address: ":80"
http:
redirections:
entryPoint:
to: "https"
scheme: "https"
https:
address: ":443"
serversTransport:
insecureSkipVerify: true
providers:
docker:
endpoint: "unix:///var/run/docker.sock"
exposedByDefault: false
file:
filename: /config.yml
certificatesResolvers:
cloudflare:
acme:
email: ${CF_API_EMAIL} # Email of your cloudflare account here
storage: acme.json
dnsChallenge:
provider: cloudflare
resolvers:
- "1.1.1.1:53"
- "1.0.0.1:53"
log:
level: INFO
filePath: "/var/log/traefik/traefik.log"
accessLog:
filePath: "/var/log/traefik/access.log"
|
Now navigate back to the root ./traefik folder, and re-create the container
1
2
| cd ../
docker-compose up -d --force-recreate
|
Testing Traefik
Don’t take any further steps until you are certain traefik is working. Check the the log file, ./traefik/logs/traefik.log with tail -f traefik.log for errors, and work from there.
Setting up Crowdsec
With our traefik container running and doing all of its proxy magic, now we can setup our security item. Crowdsec. navigate back to your root folder beneath ./traefik and make a new directory titled crowdsec, with a config/ folder, and a docker-compose.yml file.
1
2
3
4
| mkdir crowdsec
cd crowdsec
mkdir config
nano docker-compose.yml
|
Within this docker-compose file put the following for now:
 1
 2
 3
 4
 5
 6
 7
 8
 9
10
11
12
13
14
15
16
17
18
19
20
21
22
23
| version: '3.8'
services:
crowdsec:
image: crowdsecurity/crowdsec:latest
container_name: crowdsec
environment:
GID: "${GID-1000}"
COLLECTIONS: "crowdsecurity/linux crowdsecurity/traefik"
volumes:
- ./config/acquis.yaml:/etc/crowdsec/acquis.yaml
- ./db:/var/lib/crowdsec/data/
- ./config:/etc/crowdsec/
- ../traefik/logs/traefik-access.log:/var/log/traefik/:ro
# This volume points back to the traefik logs we are writing and storing locally
ports:
- "8083:8080"
networks:
- proxy
restart: unless-stopped
networks:
proxy:
external: true
|
Next, create config/acquis.yaml. This houses the config telling Crowdsec to look for the Traefik Logs.
(NOTE: This must be a .yaml and not .yml)
Fill it with the following config:
1
2
3
4
5
6
7
8
9
| filenames:
- /var/log/traefik/*
labels:
type: traefik
---
filenames:
- /var/log/auth.log
labels:
type: syslog
|
While in ./crowdsec, spin it up
1
| `docker-compose up -d --force-recreate`
|
Testing Crowdsec
Again, it is critical you save yourself some time and ensure the service is working as intended before moving forward. Trust me.
Check first with:
1
| `docker exec crowdsec cscli metrics`
|
Search for the top of the result, and check that crowdsec can see and is parsing files from /var/log/traefik/
If it is, you can continue! Otherwise look back and just double check syntax and what not.
Integrating Crowdsec and Traefik
Run a couple of commands into the crowdsec docker container to update it, and bring versioning into line of our collections in use from the docker-compose file, ‘crowdsecurity/linux’ ‘crowdsecurity/traefik’
1
| docker exec crowdsec cscli hub update && docker exec crowdsec cscli hub upgrade
|
If you wish, you can automate this, to ensure constant updates between the local crowdsec, and the remote updates from the repos. I’ll be keeping it up-to-date by using ansible-semaphore.
Automating Updates with Cron
Run the crontab -e command. Select 1 for /bin/nano, and at the bottom put in
1
| 0 0,6,12,18 * * * docker exec crowdsec cscli hub update && docker exec crowdsec cscli hub upgrade
|
This will update and upgrade the hub every 6 hours.
Enhancing Crowdsec with a Bouncer
We will be using a bouncer designed for traefik (Shout out to: fbonalair for creating this: https://github.com/fbonalair/traefik-crowdsec-bouncer).
Go back into your traefik folder, and nano docker-compose.yml, add the following to your file to have it start up right after your crowdsec container:
 1
 2
 3
 4
 5
 6
 7
 8
 9
10
11
12
13
14
15
| bouncer-traefik:
image: docker.io/fbonalair/traefik-crowdsec-bouncer:latest
container_name: bouncer-traefik
environment:
CROWDSEC_BOUNCER_API_KEY: ${bouncer-api-key}
# Get this api key by running `docker exec crowdsec cscli bouncers add bouncer-traefik`
CROWDSEC_AGENT_HOST: crowdsec:8080
GIN_MODE: release
ports:
- "8082:8080"
networks:
- proxy # same network as traefik + crowdsec
depends_on:
- crowdsec
restart: unless-stopped
|
Once you have your API key in the file, run docker-compouse up -d --force-recreate and have it create the bouncer.
Update Traefik to support the bouncer
Now, navigate back into the Traefik folder and edit the data/config.yml file. Add the following to the http: -> services: -> middlewares: section:
1
2
3
4
| crowdsec-bouncer:
forwardauth:
address: http://http://bouncer-traefik:8080/api/v1/forwardAuth
trustForwardHeader: true
|
You must also add this middleware to your config/traefik.yml file, causing the redirect out to the bouncer at the time of access:
 1
 2
 3
 4
 5
 6
 7
 8
 9
10
11
12
13
14
15
16
17
| api:
dashboard: true
debug: true
entryPoints:
http:
address: ":80"
http:
redirections:
entryPoint:
to: "https"
scheme: "https"
https:
address: ":443"
http:
middlewares:
- "crowdsec-bouncer@file"
|
With that done, run docker-compose up -d --force-recreate for traefik.
Reaping the Rewards: Enrolling CrowdSec
Now that crowdsec is working, lets enroll our client. This will add benefits with a overall a nice dashboard to manage it
- Easily monitoring alerts
- Seeing activity going on
- Bounces occuring
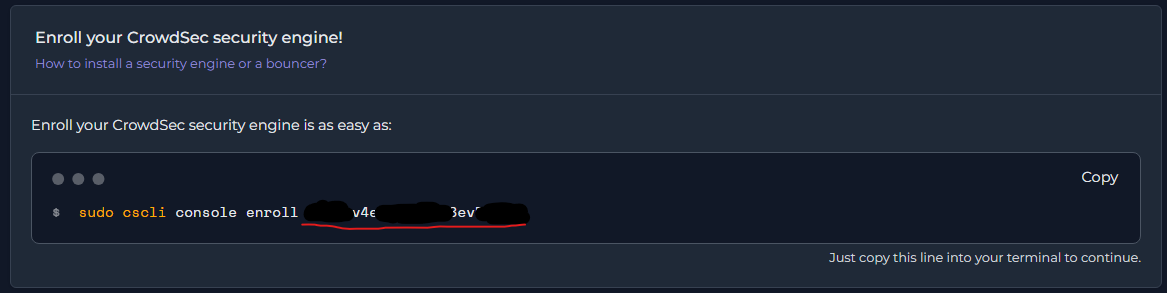
- Navigate to CrowdSec’s website
- Create an account.
- Search for ‘Enroll your crowdsec security engine!’ and copy the code at the end of it (see picture below).
- Back on your Crowdsec host, run
1
| docker exec crowdsec cscli console enroll code-pasted-here
|
- Once pasted, run
1
| docker restart crowdsec
|
- Go back to CrowdSec’s website and accept the instance
- Enjoy your management dashboard
Notable benefits of Enrolling:
- You can receive notifications when your bouncers get updates.
- You have the ability to sync your scenarios across all of your bouncers, making management a breeze.
Exploring More
Interested in taking your security measures to another level?
- Figure out how to add Authelia behind your crowdsec and traefik containers to enhance security a step further with multi-factor web access for your apps. More info here.
- Check out this plugin for Traefik: Crowdsec Bouncer Traefik Plugin
Useful Crowdsec commands
To easily execute the following commands, you can use this to exec into your crowdsec container.
1
| docker exec -it crowdsec /bin/bash
|
 1
 2
 3
 4
 5
 6
 7
 8
 9
10
11
12
13
14
| # See all parsers and scenarios deployed
cscli hub list
# See all decisions that have occured
cscli decisions list
# See all alerts at a glance
cscli alerts list
# Block a specific IP
cscli decisions add --ip 1.2.3.4
# Unblock a specific IP
cscli decisions delete -i 1.2.3.4
|
Useful Resources
Here are some useful resources for further exploration: